Happy Easter!
Below you can find some Easter activities to do with your children - some involve chocolate (!) and some don't! There are also some links to other resources and websites that you might like to use too! With love and prayers during such a difficult and strange time for everyone.
Below you can find some Easter activities to do with your children - some involve chocolate (!) and some don't! There are also some links to other resources and websites that you might like to use too! With love and prayers during such a difficult and strange time for everyone.

An Easter Egg Story…
Here’s a fun way to connect chocolate Easter eggs with the story of Easter from the bible.
Sit down together (having washed your hands😊) and enjoy peeling the foil wrapping off a hollow chocolate egg. Hold the egg in your hand.
Jesus died on the cross on Good Friday. Jesus’ tomb was a bit like this egg – with the big stone rolled against the tomb entrance, inside it must have been dark and cramped. It’s as if the darkness makes it still Good Friday, the day that Jesus died.
But on the first Easter day, Jesus came alive again, and burst out of the tomb. Good Friday is broken once and for all, and new life is set free.
At this point, feel free to smash the egg and start eating the pieces. You could have some grapes or raisins to nibble in place of chocolate. While you eat, keep going with thinking through the story.
But the trouble was, that nobody saw it happen. The soldiers who were guarding the tomb had fainted in fear, and the next thing we know, Mary arrives at Jesus’ tomb and finds that Jesus is not there. The actual moment of the resurrection happened in private. All that excitement and joy and nobody to share it…
On Easter Sunday we focus on Mary’s story. There in the garden, the resurrection had already happened, but she didn’t yet know this, so is very sad. It is still Good Friday to her.
But, when we read Mary’s story we can tell the exact moment when the resurrection happened for her – it’s when Jesus calls her name and she recognises him! Suddenly, all her sadness is turned to joy. Mary’s Good Friday is gone.
Over the next few weeks, churches all over the world read more stories of how Jesus’ friends discovered that he was alive again: their own Good Fridays turned to Easter, all in different ways.
Dear Jesus,
Thank-you for Easter. Be with us and breathe light into all our Good Fridays,
Amen.
(You may like to blow some bubbles, as your prayers, lifting to God who hears and welcomes every one)
Make your own Easter Garden
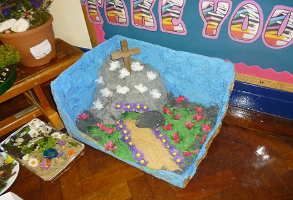
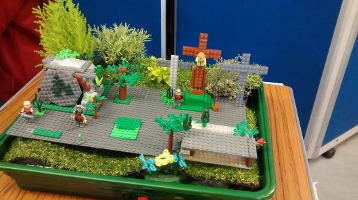
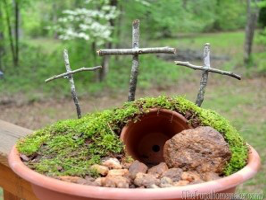
This can be anything from a simple plant pot ‘garden’ to something much more ambitious. Usually an Easter garden includes a hill with three crosses on it, and a cave-tomb (usually a smaller plant pot) with a stone against it. Some gardens also add a path made of gravel, and spring flowers such as primroses. Here is a nice easy-to-make natural version, using moss for grass, twigs for the crosses, and a small plant pot for the cave.
You can even make an Easter Garden picture instead if you don’t have the materials to make a 3D one from natural objects – try cutting the pictures out of the seed catalogues that are often delivered free from local garden centres.
Or from sweets, biscuits or lego!
When you make the garden, put the stone in front of the cave. On Easter Sunday, roll the stone to one side (or peel it off if you made a picture) to help tell the Easter story.
Build a Junk Sculpture Tomb!
Junk sculpture tomb You will need: · lots of scrap materials (these can be sourced from your local scrap store) · large cardboard boxes · sticky tape and PVA glue · old sheeting or material · paint · other things to decorate your junk sculpture tomb Tell the children the part of the Easter story with the tomb and say together we are going to make a giant tomb from scrap. Have a few images of tombs to help their imaginations. Then invite the children to build a giant scrap tomb. This can be used to help tell the Easter story.
Junk sculpture tomb You will need: · lots of scrap materials (these can be sourced from your local scrap store) · large cardboard boxes · sticky tape and PVA glue · old sheeting or material · paint · other things to decorate your junk sculpture tomb Tell the children the part of the Easter story with the tomb and say together we are going to make a giant tomb from scrap. Have a few images of tombs to help their imaginations. Then invite the children to build a giant scrap tomb. This can be used to help tell the Easter story.
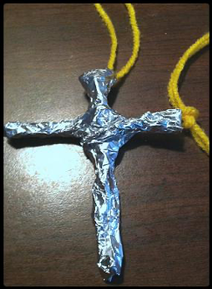
Materials:
· 1 piece of tin foil
· 2 feet of yarn
Instructions
1. Cut a square piece of tin foil off of the roll. The larger the square, the larger the cross will be.
2. Rip the tin foil in half to make 2 strips.
3. Fold the two strips in half several times to make narrower strips.
4. Arrange the two strips across each other in a cross shape.
5. Cut a 2-foot length of yarn. Wrap the top of one of the strips around the center of the piece of yarn to attach it to the foil.
6. Wrap the second strip of foil around the first to hold it in place.
7. Pinch the cross all over to crinkle it up and define its shape.
8. Tie a knot in the ends of the yarn to make a necklace loop.
Proudly powered by Weebly
